Monday, March 19, 2012
Twins
Without reading the title of this post, did you notice a little trend with this card? Two onesies, two buttons, pink... My friend recently had twin girls! She had 3 kids under the age of 2!!! How insane is that?!? I went for a little visit today and honestly folks, I don't know how she does it. Makes me afraid of motherhood. And no, I'm not pregnant.
Saturday, March 17, 2012
Happy Bermuda Bay Birthday!
 Wow, I just found this post in my drafts... from who knows how long ago...
Card Recipe
Stamps: Happy Everything (SU), Of The Earth (SU)
Ink: Bermuda Bay and Summer Sun (SU), Versamark
Paper: Whisper White, Bermuda Bay, Elegant Eggplant
Embellishments: Corduroy buttons in Summer Sun (SU), Amethyst embossing powder (Stampendous),
Tools: Heat gun
Friday, March 16, 2012
A Note of Thanks
So I was trying to be all smart and decided to crop the photo. Little did I realize that it'd turn out like this... Oh well! I recently needed to make a bunch of thank you cards and with time being very hard to come by, I needed these suckers to be fast and cute. I think they turned out quite cute and for the fast factor? Well it took a couple nights to finish but at least it got done, which is the important part. They are 3.5" x 3.5" the stamped image is just using a clear stamping block! I've wanted to use that technique for the longest time now and I'm so happy with how they turned out. At first, I couldn't get the block to look very good. One lady on youtube suggested spraying the block after you ink it with some water so it helps the ink distribute. 100% not needed folks. I just needed to stamp it on something semi-squishy. Whether that be a cutting mat or in my case, a little stack of card stock. Whatever you're stamping on just needs to have a bit of give for the block to really make contact with the card stock. Stamping on a hard desk surface failed miserably. Have a great weekend everyone!
Gift Box
How cute is this little gift box?! We made this at our last team meeting as well and I didn't get around to posting the picture. The kraft boxes come in a set of 4 for only $3.89. Super easy to assemble. We just covered the 4 sides with the Sale-a-bration paper and on the top we used the new Designer Rosette Bigz XL die. It definitely beats punching the edges and scoring to make each rosette. Just run it through the machine and it cuts and scores for you!
P.S. Please ignore the Charmin toilet paper in the background... =)
Sunday, March 11, 2012
Sweet Cake
If you haven't purchased this new stamp set yet, Sweet Cake, please do! I love the feel of this little stamp set. It's fun, hip and young looking. Everything that I feel I'm not right now. I can see myself getting a ton of use out of this little guy and I sure hope they keep it around for the new 2012/2013 catalogue. Hope you all had a great weekend.
Sunday, March 4, 2012
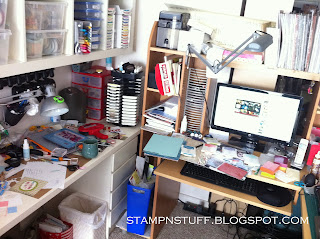
The Chaos That Is My Refuge
I know everyone can relate to this post. =) At work, I hate disorganized work stations. Everything should be labelled, put in a binder or filed. At home... completely different story. I'm lucky enough to have the entire basement as my crafting area and I hope that when we start thinking about renovations for the basement, I'll be able to keep a large portion of the basement dedicated to my hobbies, with the exception of perhaps more built in shelving that will keep me more organized. In the meantime, my basement looks like the aftermath of a tornado with winds gusting up to 130 km/h. I have no shame in sharing my crafting area with you all because I know every one of you who reads this blog has tornadoes hitting on a regular basis too. So without further adieu, I present to you all, my basement refuge.
I sit right on the middle of all this stuff so I have essentially 3 work surfaces. The one on left is my stamping area. The computer is where I lay out a lot of random things and blog of course. The right hand side which you can't see is where I keep my Simply Scored board and my Big Shot. There's actually a table that is an extension of my desk that you'll see in the last photo.
This photo was taken this morning, no tidying, no adding of things (except my cup o' joe).
I realized I haven't labelled these new In Color stamp pads yet so that's why they are all laid out. I usually punch out a piece of the coordinating card stock with the word window punch and glue it onto the end of the stamp pad. It makes it way easier to see and sort. Stampin' Up sells sheets of labels with the ink pad names but I find this way much better. I don't have to worry about buying more labels if I get new In Colors or perhaps it's the simple fact that my aging eyes don't like reading those little tiny black letters.
That table on the right is the extension I was talking about. It's got my big cutting mat on it for when I sew and need to cut fabric. Right now, it's storage for my thank you cards and that big red box of Project Life items. The table at the back is where I usually hold workshops but again, it's used for massive storage right now. So that's half my basement. Hope you enjoyed the tour and I would love to see your space so leave me a link to your post if you have something up already on your blog. =) Happy Sunday everyone.
Thursday, March 1, 2012
A Bit Late
A dear friend had her birthday a few days ago. I didn't get a chance to see her so I decided to make a belated birthday card. I forgot about those little leaves die for the Big Shot and how much I love them! That houndstooth background wasn't my favorite but it's definitely growing on me. It works great as a background and not a focal point because some of the other impressions folders I have draw way too much attention. The card CASEd Kristina Werner's card found here.
Subscribe to:
Posts (Atom)


