Friday, January 30, 2009

Ear Gluing


So we finally found out just over a month ago that Khuno's ears should have perked as early as probably 8 weeks. So now that he's 9 months... we're upset that the breeder Vanderbilt Samoyeds never told us about gluing his ears up. It wasn't until I asked her through email about when his ears were supposed to perk did she tell me that I should glue them. And we did more reading and found out you're supposed to glue their ears to help them perk when they're TEETHING!! And he's way past teething now. He was probably teething at like 3-4 months.. sigh. So anyways we ordered some Jiffy Sew as the breeder suggested and it cost us flipping $20 including shipping from Pet Supply House. For some reason they felt the need to ship us this tiny tube of glue in a huge box with paper padding.. therefore charging us just over $10 to ship it!! Ridiculous. AND they requested a signature! So we got the first tube of glue and it ends up being all putty like and we emailed the website and Jiffy Sew and Pet Supply House managed to send us a new one. Their explanation was that extreme temperatures can cause that change. And of course that was the time where western Canada was having the -40 degree celsius temperatures. The Jiffy Sew owner was incredibly nice and really helpful even though we didn't buy his product from his site.
So all this post was really meant for was a before we glued his ears and pictures of how his ears look 5 min after we applied the glue (badly). Hope you enjoy! I call his newly glued ears little devil ears. =)
I tried to glue his left ear to the fur in the middle of his head cuz the glue wasn't holding so for a while his ears were glued back and all Jamie could say was, "That doesn't look right. What if they stay like that?" and all Khuno had to do was do a quick shake and again his ears went floppy. So I tried to apply more glue along the inner edges. And now that I'm typing this, I wonder if I remembered incorrectly and was supposed to glue the outer edges... Hm.... I'll have to look that up again. Anywho, don't mind his eye crap, we didn't get a chance to clean them before the picture.

Wednesday, January 28, 2009

WUAC Wednesday

Well you might be wondering what the heck WUAC Wednesday means. I've been chatting with Jamie and we've both started a blog. You can find his HERE. So we're both in this non-announced race to see who can get more hits and views. He's way more hardcore than I am and I can hardly compete since he's got videos soon to go up on knitting tutorials and many other coffee reviews coming up as well.. Well I figured I better try something. So I decided to do what many other blogs do (not very creative I know) and have a specified card making/sharing day once a week. I've chosen Wednesday since that gives me usually Sunday night to work on it and if I'm lazy and procrastinate, I can work on it on Monday and Tuesday.

So I was trying to come up with some sort of catchy name like Kristina Werner's MACM. Jamie kept trying to coax me into "Wednesday's card club". I tried explaining to him that it's not really a club that I'm starting. I just wanna share something that I do and sometimes I find I need those blogs that share layouts or color combos and things that get my creative juices flowing. I finally decided on Whip Up A Card Wednesdays. Not too shabby of an acronym. WUAC. I'd pronounce it just like it looks. "Whack" Wednesdays. 

For the first WUAC Wednesday post (even though it took me so long to WUAC that it's almost Thursday) I am posting a thank you card that I made for my coworker. She had ordered 12 thank you cards from me and I managed to finish 11 of them and the last one I managed to take pictures of the process. So lets see how this goes. If it proves to be way more difficult than videographing myself then I might have to move that way. Although, I did have to listen to Jamie record himself showing his readers how to cast on and that wasn't too fun to listen to. It'll be my last resort. So here goes the picture posting/writing..

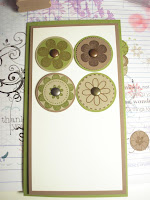
1. I had leftover very vanilla cardstock with chocolate chip textured CS from Christmas cards so I started out with that and the set Big Flowers from Stampin' Up! So I was inspired by a card I found on SplitCoastStampers. I don't have the exact card on hand but it used a variety of greens, browns and kraft with the set. I used a combination of old olive, close to cocoa and chocolate chip. I stamped some flowers and punched them out with the 1 1/4" circle punch, layered them onto another color and punched them out with the 1 3/8" punch. I tried using the scallop punch for one of the flowers but I didn't like how it looked.


I layered them down and realized they're missing a little something something so I busted into my embellishments drawer and found some antique-ish looking brads that I had. I don't remember if I got them from the dollar store or Michael's.


So before I had all the supplies that I do now, I used to take scissors to poke holes to put my brads through. Then I bought the Crafter's Tool Kit from Stampin' Up and for the small brads I use the paper piercer and mat. These brads were quite a bit bigger so I used the 1/16" circle punch and punched two little circles side by side (almost like a slit). If you don't have this itty bitty punch, it's definitely worth the $11.25 because it's great to add extra detailing to scalloped edges or punching little holes out on any artwork. It's better than piercing sometimes.
I fiddled and fiddled with different layouts and couldn't find anything that I liked so I had to change the base completely. I swapped out the very vanilla 5.5"x4.25" base and swapped in a old olive (you'll notice I love old olive) 6.25"x3.5" base and layered onto that with close to cocoa and very vanilla. I thought about leaving it like the picture and just stamping the sentiment on the bottom right but again, I felt like it needed a little something.


I was at Michael's last week and they had this great sale on ribbon. It was on those tiny tinee rolls where the ribbon is mighty skinny. They were going for 3 for $1.00!! So I picked up 9 rolls, all different colors. I added a bit of brown and for some reason it gives the card a bit of an asian feel for me. Kind of like a sliding door of some sort. Whenever I use brads I usually throw the item onto dimensionals because they just don't seem to glue well with just plain adhesive. So after popping all that up, all that was left was the sentiment.

I just hate stamping sentiments with a passion. It always ends up crooked one way or another. I find the Stamp-a-ma-jig works awesome. If you need a tutorial on how to use it, visit Kristina's blog HERE.
Well that's the end. It probably is easier doing a video but that card took a total of about an hour after I hummed and ha-ed and fiddled and changed. So until I get really good at deciding what looks good together, I'll stick to pictures. Hope you enjoyed the very first WUAC Wednesday!! (Thursday... lol) and goodnight!!

Monday, January 26, 2009

Photo Taking HORRORS

Now did anyone ever think that taking a decent photo would be this difficult? I just spent the last 2 hours fiddling and trying to take a decent photo to post my cards. I have a hard time taking photos during the day because I'm always busy or I'm at work so as the night owl that I am, I'm finding myself stuck with taking photos at night.


So I did some reading on tips and I started off with a photo light box which Jamie was going to make me. So he goes out to Home Depot to buy this huge sheet of some sort of posterboard. Cost him $20. He hacks up the huge sheet (we're talking like 1/2 a sheet of drywall size) so it can fit into his little Cavalier to drive home. That very same week, he strolls into Office Depot to find that they're going out of business! So he pokes around and finds a photo light box for $40. So knowing Jamie, he buys it. Now you'd think that having this photo box would help with my photos... Unfortunately it really hasn't. I don't know all these crazy settings on the cameras and I had to ask Jamie why my pictures were so blurry!! Darn that macro button. Now I'm asking around and find out I should play with my white brightness on my camera. Ok so now I've done that and it just makes everything look... well.. like when you are watching tv and you turn the brightness WAY up and it's like blaring bright but yet all the colors are still faded. So finally today we were at Ikea and we found this super cheap $10 desk lamp. The kind that clips onto the side of your desk. Threw in a bulb and tried and tried between my camera, Jamie's camera, my desk with the lamp and the lightbox. I still haven't been really able to perfect it.

My old photos I thought looked pretty good but there's something wonky with our desktop and all my photos look great on there! But on any other computer, my photos have this weird yellowish hue... If you don't believe me, check out all the cards in my Etsy shop. Or easier yet, just check out the photos from my previous posts. Anything that's got a picture of a card will be a picture of a card with yellowishness. Gross..
So I think I've finally gotten a somewhat decent (nowhere near good) photo. And I'm calling it a night before I get more frustrated and smash that new lamp I bought.

Thursday, January 22, 2009

Color Inspiration #39

**UPDATE** I tried to complete my vision again and played with the original flowers I punched out on Thursday night. Here's what i came up with.


So it's super late and as usual I'm up and making cards. All these cards are really cutting into my sleep time! It's 1 A.M. for pete's sake!! Anyways I better post quick and head to bed. So another wonderful color inspiration from Kristina Werner. The colors were a bit hard for me and I had, yet again, this amazing idea in my head and of course it just never ever turns out. I guess that's my only saving grace is that everything is always better in my mind than in reality.


Anyways back to the card. So I had to take a break from a few inspiration challenges because I've been busy helping my brother and his fiance make wedding invitations!! If you're interested at all, she's documenting her entire wedding journey HERE. She's got pics posted and everything. Way more on top of it than my blog and she's probably the most organized bride I'd ever seen. She's pretty much done everything for the wedding (except the invites because I'm involved with that and I procrastinate) and she isn't getting married till August!!

I'll try to draw a mental image of what I saw in my lovely brain. I was picturing way smaller circles of flowers. I did try it but I wanted a smaller border for the green and I couldn't do it with the size of the punches I had. Sucks that there isn't something in between the 3/4" and the 1". And for some reason in my mind (must be cuz it's late) I thought the border would be smaller if I used a 1" and a 1 1/4"..... So I started out with itty bitty flowers from the Itty Bitty Buds set (New lvl 2 hostess set!) and my green thumb just made the buds grow a bit to fit the 1" punch. Those I stamped with So Saffron. Then I just punched them out and layered them onto Certainly Celery cardstock. I tried the Green Galore and it was BRIGHT! (bold brights.. duh!) so I had to back down and admit I wasn't brave enough to venture down that road. Those were then put on Basic Black with dimensionals. I used the white gel pen for the first time! Drew a mini border. Popped all of that onto more Certainly Celery. Then put that on the Real Red card and stamped a sentiment from Best Yet (Retired Hostess set). Topped the card off with a little black polka dot ribbon that I got from Costco! Yes I admit it's not the greatest. Oh I forgot that I was trying to draw a mental picture for you. So if you will.. Picture smaller circles with flowers. and I pictured a number of them on the black in various places, then I was going to draw swirly lines kinda like bumble bee lines. If that makes sense. And that's about all of a vision I had.


Anyways it's mighty late and I'm tired. My lovely fellow stuck in a black card making hole friend Arlie bought some beautiful crocheted (I can't spell it) flowers to put on cards as inspired by Stampin' Up! and gave me a few. I'll have to play with those on my big whopping 6 days off!! Till the weekend, stay happy! It's mini Friday today!!


Monday, January 19, 2009

NEW STAMPIN' UP! CATALOGUE!

I'm so excited!! The new catalogue is out for Stampin' Up! and there are a number of sets that are a must have on my list.

If you haven't had a chance to check it out yet, go to the link your right hand side!

Enjoy!!

Saturday, January 17, 2009

New Year Caardvarks Challenge


So I've tried to get off my lazy butt and get back into the card challenges. I really like the layout for the Caardvarks challenge. I ended up trying to put a card together last night till 1:30 AM and ended up with this. It looked way way better in my head (as it always does). I hummed and hawed and played and cut and trimmed and colored and reglued. Man it takes a long time for me to get my creative juices going. I ended up using paper 3 different sources: Stampin' Up!, K&Company and just some pads I bought from Michael's. It was also my first time using rub-ons and it was semi-successful. I realized it's probably smarter to cut out what I'm going to rub on as opposed to having the entire sheet exposed.

I'm also making a set of thank you cards for a coworker and while making cards for her, I made some for myself as well! I actually copied this layout from a card I saw on Splitcoaststampers. I didn't have the ribbon or the stamp set but the layout is still the same. Now I've seen cards that people make which they claim they have "CASEd" and I searched and googled and can't figure out what the heck "CASE" means.. If you know, could you please leave me a comment!!

Anyways tomorrow is a day full of invitation making for my brother and future sister-in-law. I better get to bed!!

Thursday, January 15, 2009

Ribbon CRAZY!


So I was at Michael's today and this week they have a sale on American Crafts ribbon. I was sooo excited!! They were $1.99 a roll and yes I know you only get a little over 2 meters but I just love the designs and colors so I splurged a bit. And as I was lining up for the checkout, I found a bin of ribbons for $0.60 each!! Oh my, so I made Jamie line up for me while I went and dug and scrummaged (is that even a word?). It may not be the best deal for the amount of actual ribbon you get since the $0.60 rolls were only 1 meter of ribbon.... but meh, I'm happy!

Sunday, January 11, 2009

Saturday Spent with Friends

So yesterday afternoon was spent with friends, food and cards! I had a bunch of friends over from work and we had a mini potluck yesterday afternoon. It was really fun to get together outside of work on a weekend and no one was rushed to go home and it wasn't late in the day. It was awesome! The picture is missing little Daisy who was late because she was baking biscuits FROM SCRATCH!

We had two cards to make and I decided to introduce aqua painting. Everyone in the group was absolutely AWESOME! Everyone stepped out of the box and because we had it at my house, they had full access to all of my stamps and inks. So all of them ventured out and their creative juices were pouring!! They changed up the layouts, colors, the coloring. It was so much fun to see the wheels turn for everyone when they put their own special touch in and made their card their own.

I had lots of fun and I hope everyone else did too. I'm excited for the next time we get together and we'll have a new catalogue to buy from! Khuno had lots of fun too hanging out around all the ladies! It's been a looong time since I've held a workshop and yesterday just got me all amped up to get organized and have more!


Thursday, January 8, 2009

It costs HOW much to ship???

So I head home after work today and made sure Jamie helped me pick up some envelopes so I could mail my first card order out. I've got 2 options to choose from.
1. A rigid mailer. Pretty much an envelope made from harder cardboard.
2. A bubble cushion mailer. Your typical bubble wrap lined envelope.

So I go to the post office and I'm picking the poor girl's brain for like 15 minutes. I want to figure out what would be my shipping options and what would be the most cost effective but yet will be the safest way to ship my cards.

This is what I've come away with:
- Regular mail costs $0.52 to ship in Canada, $0.96 to the States and $1.60 international.
- Regular letters must fit through this tiny slot and it MUST slide through without someone having to come push it down.
- If your letter is anything out of the standard mail, the price automatically jumps up by around $1.00. So both of those little shipping envelope options would be at LEAST an extra $1 something to ship.
- If your "letter" is anything out of standard, it has to weigh less than 60 g. 60 GRAMS!!!
- If your "letter" is heavier than 60 GRAMS, then the price goes up to $3.75.
- If you want your "letter" or "parcel" tracked to provide your buyer with a tracking #, internationally speaking, the price STARTS at $40!!!!
- Quotes for these "letters" that I did on UPS and Purolator to send to crazy international destinations were over $150!!
- When shipping international, Canada Post can't guarantee anything when you don't purchase the extra guarantees at a big cost. They can't guarantee the letter won't be bent, won't be opened or even if it'll make it there!!
- Shipping by non-air (by boat) can take up to 3 MONTHS!!
- Shipping by air, my "letter" should arrive between 7-14 business days.

I think that's about all I've learnt. So in a nutshell I've learned that I've GOT to find a cheaper way to ship, I charged too little shipping for my first card order, shipping international is a crapshoot, I've made about -$1.00 and that doesn't even include the cost of all the materials for the card itself or the time or the money to post it onto Etsy. Lesson learned though, gotta find a better way to ship. Because in the end, guess how much it cost me to send my first card purchase to LITHUANIA? $3.94 Totally blows.

So lets break it down... Card sold for $4 USD including shipping. Paypal takes $0.50 for transaction fee. Etsy cost $0.20 USD to list and takes a 3.25% cut. Rigid envelope cost $0.60 CAD. Clear envelope I put the card in to ship cost $0.10 CAD. Shipping cost $3.94 CAD. I'm not interested in doing the actual math but all I know is in my paypal account I've got $4.09 CAD and JUST shipping cost $3.94. So..... yeah......

Wednesday, January 7, 2009

First Sale on Etsy!!

Oh my goodness!! I'm sooo excited!! I just logged onto my Etsy account about 30 minutes ago and found out someone bought a card!! It was the happy birthday card made with the Wow Flowers stamp set.

I wanted to see my items sell but I guess I never really thought they'd actually sell.. And now that something sold, I'm all nervous and my belly is in knots. Questions like:
1. How am I going to ship it?
2. Am I actually going to lose money with shipping?
3. What if the person doesn't like the card?
4. What if it gets lost in the mail?
5. How do I work the whole PayPal thing?
6. Do I need to put a shipping label?
7. Should I email the buyer on Etsy to confirm the address?
8. Do I even need to confirm it if it's already on PayPal?
9. Oh my did this person seriously buy something??
10. Why didn't this person add my store to their list of favorites if they were willing to buy something from me?
11. Seriously? I made a sale?
12. Should I buy more shipping items?
13. Should I actually go and price out how much it costs to ship?
14. Holy PayPal took $0.50 out of the $4.00 that was paid to me as service charge.
15. Are there other payment options?
16. How do I get the money from PayPal into my pocket?

That's about all I've got so far. We'll see if more come up when I actually go to ship the item tomorrow. I'll keep you posted. I've emailed the buyer on Etsy AND to the regular PayPal email to confirm the address. I kindly asked Jamie to go to Staples to buy me some shipping envelopes. I did do some shopping for those shipping envelopes on my day off and the cheapest one I found costs about $0.40 an envelope but I'd have to buy 250 of them... So in the meantime, lets not get ahead of ourselves and buy 250 envelopes. I think the 6 pack from Staples will suffice for now. And I guess I'll finally learn what's cheaper and safer to ship with tomorrow.

Thanks for reading and hopefully you share some of my excitement too!!
G'nite!

Sunday, January 4, 2009

Jamie's Baby Bonnet Project


So this is Jamie's next fun project! He really is a knitting machine! He came up with a blog called Knit Purl & Brew, a blog on exploring knitting and coffee . It doesn't actually have any posts nor has he done anything to it yet but at least it's made. That's the first step I guess eh? So anyways he made this cute little bonnet. He made it the biggest size the pattern offers and of course it's so big it even fits his head!!


So the original pattern only had braids attaching the tassels but he decided to make it a bit more special. And of course knowing Jamie, he just HAD to try on his own work. So I made him pose with Khuno. And of course what's the fun in Jamie posing alone? So of course Jamie decided to try it on Khuno first! How tempting the tassels were for Khuno to chew!!


Hope you enjoy the photos as much as I do!! Good night!

Thursday, January 1, 2009

Jamie's First Post On My Blog


This isn't actually Jamie... But I'm posting for him because he's way too lazy to do it. He had already made me a wonderful pair of green handwarmers. He made another pair in red but he made them a bit small and the green ones were a bit big. So now he's gotta make one right in the middle =)

So here is the first pic of the beautiful warmers that Jamie knit. Yes, those are my ridiculously old looking hands in the picture. Guess that's what happens when you wash your hands too much and you don't lotion enough. You have no idea how ridiculous I felt trying to "pose" these warmers for the picture. So he finished those this afternoon and he started working on a baby hat!! We were out shopping and found this ridiculously cute book on baby hats.


So this hat fits a newborn and the hat style is called "flour sac". How cute is that? The book shows this hat in white but Jamie decided to knit it in turquoise. Looks quite blue in the picture but it's actually more turquoise. The two corners are just tied with yarn to create those cute little ear like points. He'll probably start selling these items when he's made a few more. He's currently knitting a different hat behind me right now but in a large size just to see the difference between a small and large.
So when Jamie finally gets a knitting blog up and running, he'll post on there and I'll have a link from my blog but in the meantime, blue font colored posts will be Jamie's and mine will remain pink. Have a good night!! Hopefully you don't have to work tomorrow like Jamie and I.

Color Inspiration #36

Question: Now how does one know they are absolutely ridiculously addicted to stamping?
Answer: When you stay up after your New Year's party till 4 am making a card for Kristina's awesome color challenges.

So now as mentioned earlier, here's tonite's story. I was on call for work till 10 o'clock. The minute it turned 10:01 the pager went off and the alcohol went into the belly. Of course everyone at the party didn't have the intention of drinking their faces off and nor did I. We all had our champagne for the countdown (we all as in all 7 of us...) and finished watching 300. What a great movie to be playing on New Year's eve huh? Anyways, I knew that I would never get around to making a card for Kristina's challenge if I left it till tomorrow so 3 am came rolling by and after Jamie crawled into bed with Khuno, I crawled into my craft room and set to work.

So I'm relatively happy with how the card turned out. I absolutely love old olive and rose red so I was quite excited. I got my order in today with the new catalogue's preorders and also the new level 2 stamp sets. I haven't mounted them yet so I looked at my second package I received today! (UPS and Canada Post were both on the ball today) I had ordered some silk flowers that were being discounted from All That Scraps. (I love this site because shipping is VERY reasonable to Canada and you get reward points!) So I bought 2 boxes of flowers, $7.50 each. I got to use some of those flowers and it's always good news when you get to use new product. Then I finally finally finally got to use my dots embossing plate from SU which I've had collect dust for the last 7 months. Boy dry embossing is NOT easy on the wrists or fingers.. Especially when embossing dots... I also got to use my scallop edge punch which I've had a hard time putting to use. Lastly I was able one of my favorite and retiring stamp sets Wonderful Words. And last but not least, I was finally able to pull something out of my Pretties Kit to use!!

Anways it's now 4:26 and I'm exhausted... So for a quick recipe: everything used is Stampin' Up! except the actual flowers. Haahaha that was actually a VERY quick recipe.. Anyways HAPPY NEW YEAR!!!