Monday, February 22, 2010

SPCC #36, SFYTT & Stamping Royalty #7

Woot woot! I think this may be the first time or one of the very few times that I've combined 3 challenges in one!! I'm super super hooked onto SPCC. It's the only challenge that I try really hard to do every week. 
And if you haven't already checked out Sketch For You To Try, go now!! The prize is amazing so that's definitely been a good incentive to incorporate Jen's gorgeous sketches into my crafting. Her sketches have always been super clean and easy to use. Sometimes sketch challenges are a little too wild for me and I have a hard time making really busy cards. The last challenge i was able to incorporate into this card is Stamping Royalty's challenge #7. I was hoping to take part in Stamping Royalty's challenges since they first started but I'm pretty lazy. This week the challenge was to make a masculine card and that's a definite challenge for me. I don't think I've ever made a masculine card! I want to use the excuse of me not owning any masculine stamps but who am I kidding?? I don't need a masculine stamp to make a manly card! 
So lately I've been thinking there's a lot of stuff I own in my crafting repertoire that I don't touch. One of those items are sponges! I love the look and I remember having a really hard time using them when I first got sponges 2 years ago. Now I know what you're thinking... How hard is it to sponge color onto a card?? And I have no answer for you, but I just remember not liking how the cards looked whenever I tried to sponge it. Hideous!! I textured the Barely Banana with the new Perfect Polka Dots impressions folder and actually flipped it upside own and had the dots face down. The cupcakes were cut out and jazzed up with some Dazzling Diamonds. The grosgrain ribbon is glued onto the satin ribbon before being tied. 


Now totally side note. I've been watching The Bachelor the entire time I've been writing this post. And my friend Penny just posted about her thoughts on reality TV. I have to admit, I'm a reality TV junky. Now I don't watch some of the hits like Big Brother and I've watched a season here and a season there of some other big hits like Survivor, America/Canada's Next Top Model, Top Chef, etc etc. Hahah now that I think about it, I've probably watched every reality show out there except Big Brother. For those that have been following The Bachelor this season, what are your thoughts on Rosalind? Do you think she actually had "inappropriate" relations with one of the producers of the show? It's pretty hard to believe that a house full of women would make up individual lies against one other girl in the house. Rosalind's last comment about how "inappropriate" it was for the host, Chris, to hit on the fired producer's wife in Australia was her shooting herself in the foot. Anyways, Top Chef Masters is now on! More reality TV! G'nite! 


Card Ingredients
All items Stampin’ Up unless indicated.

Stamps: Out of the Box, Birthday Bliss
Ink: Creamy Caramel, Mellow Moss
Paper: Creamy Caramel, Mellow Moss, Barely Banana, Whisper White
Embellishments: Dazzling Diamond, 5/8" Whisper White satin ribbon, 1/4" Mellow Moss grosgrain ribbon
Tools: Big Shot, Perfect Polka Dots impressions folder, Stampin' Markers, sponges, corner rounder punch

Sunday, February 21, 2010

Late Valentine's Day Post

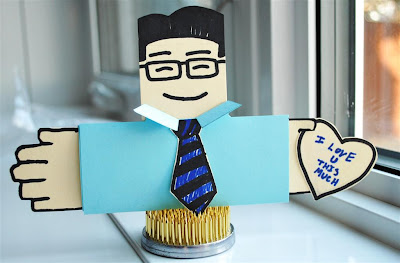
This is a touch late but I still wanted to showcase the card that Jamie made me for Valentine's day. He's a pretty crafty little guy and he's always wanting to make things cooler than I do. The very first card he made me wasn't so hot. It was done on the computer and it was for our first Christmas together. The card said I love you but the 'I' was an eyeball and the heart was an actual heart, anatomically there. Then the second card he made was definitely cool. You can see it here. on my old blog. Well he definitely succeeded again this time because he made a slider card and didn't even have instructions to do so! It actually took me another day to realize that the arms moved. Now for those of you that know Jamie, does the card version of Jamie look ridiculously like Jamie?!?!? Now if only the card smelled like him too because right now, it smells like a Sharpie marker. 

SPCC #35 & FTL #79

Boy I hate it when weekends just fly by and on Sunday you're sitting there going "Darn!". At least it's a gorgeous Sunday and the sun is shining! I'm trying out a Fall To Layout (FTL) sketch from the Clean & Simple blog. I've been following this blog for a while and absolutely love the clean lines that the sketches always offer. 
This week's SPCC colors were also nice and bright and easy to incorporate into a simple sketch. I textured both white backgrounds but you can't really tell with one of them. The summer sun used on the orange isn't very bright because I tried doing the scratch n' sniff technique but have never had success with it. It does still smell orangey though so I decided to leave it. In the photo it looks quite orange but in person it looks like a breastfeeding baby's poop. I've got a big night of card making in front of me. Hopefully we'll finish off a bit early so I can still catch the last bit of the big hockey game against the US tonight. 


Card Ingredients
All items Stampin’ Up unless indicated.

Stamps: Tart and Tangy, One Smart Cookie
Ink: Summer Sun, Only Orange, Green Galore
Paper: Green Galore, Whisper White, Summer Sun
Embellishments: Orange Kool-Aid! 
Tools: Big Shot, Textured Background Plates, 1 1/4" & 1 3/8" circle punches, sponge

Wednesday, February 17, 2010

CONGRATS Robyn!!!

We've been having a ton of babies at work. Like seriously, A LOT!!! So the latest addition is Robyn's baby girl! I haven't heard of what she named her yet so it'll have to be Robyn's baby girl for now. Kate at work bought this ridiculously cute card from Papyrus. I tried looking online for a photo but can't find one so you'll just have to believe me when I say it's super cute with a little pair of terry cloth slippers with bears on them. We're having a joint baby shower this weekend for Heidi and Robyn so Heidi got the baby slipper card. I volunteered to make a card for Robyn. Everyone (including myself!) agreed that I'm going to have a hard time making a card that's going to match the cuteness factor of Heidi's card. I really tried and I think it turned out to be quite cute. 

Now have you gals been watching the Olympics? Bah! Do I even need to ask?? I was watching the men's half-pipe snowboarding finals and the ladies downhill final. The half-pipe is so crazy to watch!! It's so amazing the strength those boarders have to be able to do those 1080s. I tried riding the half-pipe back in the day and IT'S DAMN SCARY!! I definitely don't have the core strength to be able to do any turns. Even going back and forth is tough. Pretty sure at one point I went way too fast and flew up the other side and didn't know what to do at the top to be able to turn around and slide down so I was sorta stuck there for half a second, then fell backwards. Not fun. Another experience with half-pipes... I tried skateboarding and for some reason my friend convinced me to ride a quarter-pipe hand-built in some neighborhood. Now skateboarding and snowboarding can be quite similar but not when it comes to a novice idiot pipe rider! Since one is not strapped to a skateboard, I basically stood on the edge of the pipe, leaned forward, slid into the pipe and the skateboard flew out from under me. My legs went over my head and I landed flat on my back. To make it worse, they were filming footage to put together a skateboarding video! I wouldn't be surprised if it's floating around on youtube somewhere with all these nasty comments. The even more ridiculous thing... I did it a few more times after that!! But luckily I only fell once more after that and managed to reach the other side. I just never learnt what to do after not falling! Now I'm just too old to do something stupid like skateboard! It's hanging nicely in the garage, ready for my future young innocent child to take a gander at. 

Card Ingredients
All items Stampin’ Up unless indicated.

Stamps: Little Angel, Vintage Labels, Fox & Friends
Ink: Rose Red, Pretty In Pink, Regal Rose, Versamark
Paper: Pretty in Pink, Pink Pirouette, Rose Red, Very Vanilla
Embellishments: White organza ribbon
Tools: Big Shot, Perfect Polka Dots impression folder, scallop trim border punch, corner rounder, 1 3/8" square punch

Sunday, February 14, 2010

Hypothermic 1/2 Marathon COMPLETED!!

Well I survived. YAY! I was definitely nervous when we were driving out because I've never ran that distance before. It is also very windy today, but at least the sun is shining. Helps a little bit. We fell to the back of the pack fast. At the 1km mark we were quite far back already. Khuno wasn't at the window when we ran by the first time. I ended up taking a lot more walk breaks than I expected and eating the Fig Newtons helped a lot! My muscles were definitely getting fatigued at the half way mark and my foot/ankle were giving me issues too but it just got to a point where other parts hurt more than my feet so I just kinda forgot about it! The volunteers were amazing. It's a huge dedication for them to stand out there from like 8 till 2. It's really cold when you're not running. And they are always always so encouraging. Always cheering you on even if it was the first group we passed and it was like the 1.5km mark! The biggest struggle for me was definitely at the 15km mark. We stopped for our walk break and that's when I realized my knees were hurting. My right knee was just aching and aching with each step, but we had no choice but to start jogging again because we still had 6km to go!! Boy when they say the last 3 km are killer, they are RIGHT!! 
We ended up seeing our friend Darrell who was our picture taker at about the 18 km mark. We were walking at this point and he's like "At least try to look like you're running!" and "What took you guys so long? It's freezing!" That little jerk! He's running the one in two weeks if he isn't sent out of country for work. I'll be saying the same thing to him!! So that's the first picture. Then the other shots are us crossing the finish line. We don't have our exact times yet. That'll get posted in about 2 weeks. Our rough time is about 2 hours and 45 minutes. Definitely not fast! But I made it under the 3 hour mark which was all I was hoping for. =) Now my right knee is super sore when I bend it. I just popped another ibuprofen and now I'm going to watch some Olympics and catch the zzz's. Yay! I completed my very first 1/2 marathon in the middle of winter! 


SFYTT & cQc #19

Ok I really need to make this post fast because my 1/2 marathon run starts in exactly T minus 9 hours!!! I gotta get into bed and get myself a decent night sleep. I really hope tomorrow goes ok. I shouldn't be nervous because it's the same route that we've ran for the last 2 months. At the same time though, I've never EVER in my entire life ran 21km before... And to top it all off, I've been feeling sickish all day. Belly aches and upset stomach. Upset almost to the point where I feel nauseas. Lets hope I'm not coming down with something and if I am, please let me get through tomorrow. Here's my take on this week's Sketch For You To Try (SFYTT) and Color Queen Challenge (cQc). 


Card Ingredients
All items Stampin’ Up unless indicated.

Stamps: Full of Life
Ink: Chocolate Chip & Close to Cocoa
Paper: Blush Blossom, Chocolate Chip, Close to Cocoa, patterned paper (DCWV)
Embellishments: 5/8" satin ribbon, buttons (Walmart?), felt flowers 
Tools: Big Shot, Perfect Polka Dots embossing folder, scalloped edge and trim border punches, Coluzzle, 

Friday, February 12, 2010

SFYTT, The First PPC-CC & Some Run Talk!

I just realized while typing out the title of this post that there's SOOO many acronyms with blogging!! And then I sat there for about 15 seconds thinking of how I could make the title more reader friendly... and as you can tell, I couldn't! Good thing I didn't waste more than 15 seconds! Just the extra 45 seconds typing about it.... Anywhoo I'm very excited for another day off tomorrow! It makes the 6 day stretch I did last week not so bad. And double bonus because it's the long weekend so my 4 day weekend started already! It'll be a crazy busy weekend though because we've got our monthly girlfriends gathering tomorrow night. Then on Saturday we need to go pick up our race kits and have supper at my parent's house for the end of the Lunar year. Then Sunday is the dreaded Hypothermic half marathon!!! I'm so so nervous but it's do or die time now. No more time to train so I'm just gonna aim to finish! I talked to the dietitian at our health center because she's running it also and I got great tips from her and our dental hygienist who works with the Running Room doing their walking training programs. I never even thought that I'd need to have a snack throughout the run. Who would've thought? I sure as heck never did! They both agreed that I should stick with something that I know agrees with my stomach. Jamie was going to get me some of those power gel things just because my blood sugars tend to crash easily but I guess everyone's sugar crashes when you're running 21km! DUH!!! Nursing knowledge totally didn't help me there huh? So instead of the power gels, I'll follow their advice. The walker really likes Fig Newtons because they're small, lightweight, and are high in sugar and carbohydrates. The runner just munches on dried cranberries. People just have to figure out what works for their bodies and I did try cranberries yesterday but I found I had a really hard time running, chewing and swallowing without choking. Since I wasn't swallowing properly, I got bits of berries stuck in my throat and even had a lot of burping and burped up gross cranberry once! YUCK! So I think I'll carry some dried cranberries just in case but I'll just eat the Fig Newtons during our walk breaks so Jamie doesn't need to the the Heimlich on me! They both also advised me to load up on water and stay over-hydrated. I peed about every 1 1/2 hours today! Reminded me of all the preggo ladies we have at work! After our run yesterday, I did some good stretching and drank a big tall glass of soy milk right when we got in. Today I'm feeling pretty good. Definitely would say I'm sore, maybe just a smidge tight. 


Ok onto the card for today. I wanted to make a card before bed and remembered that Sketch For You To Try (SFYTT) is offering an awesome prize for this month's sketches. I also wanted to have a color challenge and Megan is starting up her own color challenge called Picture Perfect Creations Color Challenge. It's definitely hard starting up a challenge blog so I'm doing my part in trying to help a fellow blogger out. Also helped that she used colors that I love (kraft kraft kraft!!). I always have a hard time using that many circles on a card but I think it worked out. I was humming and ha-ing between what sizes of circles, how many layers, what colors should the layers be etc etc. Then in my attempt to punch out a smaller circle from the bigger circle, I ended up with a lop-sided ring and got the idea to put all the circles asymmetrically. I thought the middle circle was missing something so I decided to try some Liquid Pearls that I had sitting there for months and months. It definitely takes some finesse and skill to use, both of which I don't have at past midnight or any other time of day. I saw on Jennifer McGuire's blog a tip with using the pearls. Something along the lines of turning it over and flicking it so it sorta gives the pearls a bit more of a 3-D look. I tried and I think I may not have used enough of the liquid because it didn't look that great. And with so many dots, I couldn't for the life of me get all the "pearls" to be the same size. When I tried to fix it, it just made things worse so I quit while I was still slightly ahead. Time for bed!! Gotta call for a haircut appt in the morning! G'nite and YAY FOR THE WEEKEND!! 

Last little bit of personal stuff to share. I got off at 8 tonite and Jamie always has dinner ready for me when I get home. He was ambitious today and cooked "Cod Three Ways" as he called it. He made a version of fish and chips, cod ceviche and pan fried cod with salad. He even made homemade tartar sauce! Took him about an hour. We both wonder how in the heck do those chefs on TV shows like Chopped and Top Chef do it in 30 minutes! We tiny home cooks will never know!


Card Ingredients
All items Stampin’ Up unless indicated.

Stamps:Happy Together
Ink: So Saffron
Paper: Bermuda Bay, Rich Razzleberry, Whisper White, Kraft
Embellishments: 5/8" So Saffron grosgrain ribbon, silver brads, Liquid Pearls (Ranger)
Tools: Big Shot, Textured Plates #4, 1 3/4", 1 3/8" and 1 1/4" circle punch, paper piercer and mat

Thursday, February 11, 2010

Wooohooo!

Well a lot of people already got big big boxes full of stamping goodies but mine just arrived today!! I know a lot of you likely saw these cute boxes Stampin' Up was sending out but I just think it's so cute how it has the little "Caution" statement because it's ohhhh so true! I was kinda disappointed that I only had one box waiting for me because I was so sure I bought enough stuff for two boxes but alas, big spending doesn't have to be on big items! So other then a ton of stamp sets, I got a TON of ribbon!! 


I just spent the last 2 hrs and 15 mins putting together some ribbon bundles for a few girls. Boy, I sure hope they appreciate it because it sure took a long time!! And doesn't it just look so much nicer than throwing it all in a ziplock bag? Just say yes so I don't feel like I've just wasted 2 hours of my life!! Now the other thing I was doing tonite was filling out little valentine's day cards! They're cute and tiny and just a little something something. I know they look very plain but in person they have a bit more of a wow factor. I sprayed the real red card stock with the shimmer mist and the images are all embossed with white powder. I love little 3x3 cards. The perfect little note to hand out that's bound to make someone's day!  


So it's 3 days now till the big race day! Today was the final run before the real race on Sunday. We did a quarter marathon today. Hahah Basically 10km but it just sounds more hardcore saying quarter marathon. Only because a lot of people don't know how long a marathon is and it sounds long. We did the quarter marathon in 1hr and 20 min. I don't know how my legs will hold up for the full half marathon because at like the 8 or 9 km mark my right foot was in rough shape. My foot was getting numb, my arch was starting to hurt, my ankles hurt and it just plain hurt with every step I took. So we got home and did some stretching and drank a huge glass of soy milk. Did you know that the optimal time to help your muscles heal is in the first 15 minutes after your workout? In that 15 minutes you should take in protein to help your body heal so that can be a glass of milk, protein shake or supper! And yesterday we got Khuno to come snuggle on the couch with us for about 10 minutes, then he got too hot. He was ooooh so cute and we tried to capture the picture. Take a little gander at the photos below! Now would you look at the time! Phew, 12:16, time for bed! 

This is Khuno sleeping by the door about 15 minutes ago and now he's awake and staring out the door. Watching and waiting for that darn Siamese outdoor cat with the bell on its collar. Stop taunting my dog already!!! 

Monday, February 8, 2010

Yet another easel card!

Well I think this is finally the last piece of left over "scored for an easel card" soft suede card stock. Phew, it feels like I've been making easel after easel!! Now you can't tell from the photo but I decided to try making some shimmer mist with some rubbing alcohol and the shimmer paint from Stampin' Up. I must say I LOVE IT!! I had bought some from Tattered Angels Glimmer Mist and find that it's a bit difficult to use because it runs on the paper. It's almost as though you've spilled some glimmer water and you have to move the water around. I end up drying it with my heat gun just so I can get rid of the water! Using rubbing alcohol works waaay better!! I sprayed the Bermuda Bay card stock and the yellow flower made from crumpled scalloped circles. There is no sentiment as I can't think of one that would fit nicely on it. Ok, enough easel cards!! 

Mini Interoffice Envelopes for Liz

It's been a while but about a month ago my best bud Liz calls me in a panic asking if she can come over to finish the scrapbook she was making for her and Bang's 8 year anniversary. I had to work that weekend so I couldn't pull the long hours that she did and let me tell you, she pulled some LONG hours. We're both such procrastinators and never ever learn. She basically lived at my house that weekend. She did finish though and the final product was GORGEOUS. I don't have pictures of it though =(  She was thinking of having some sort of envelope to hold all of their old movie stubs etc so I thought it'd be super cute to make some little interoffice type envelopes. It took a couple tries and some sketching to figure out the measurements but the final product was super cute!! 


7 Permanent Adhesives Tested and Compared!

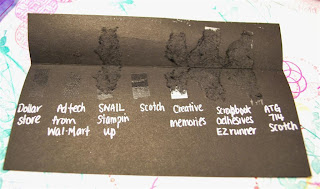
Well I have been crafting for about 2 years now and I'm always testing out new adhesives and of course being Asian, I'm always looking for a good deal! After testing out numerous different types of permanent dry adhesive runners, I thought I'd test them out side by side. I first tried it on white card stock and the results were impressive but it didn't photograph well. So I started all over again on black card stock and it turned out great! Now I tested 7 different types of adhesive. All claim to be permanent. I don't remember the costs of them but I put them in order of what I think is least expensive to most expensive. I'll tell you what I think about each one and feel free to tell me if you have any different opinions or have other adhesives that you like better! Please note that I applied a heck of a lot of burnishing to the card stock with my bone folder! 
1. Dollarama glue-a typical dollar store glue. It's cheap. You'll see from the picture that it really didn't glue well at all. I used to buy this all the time but realized that I needed to use a lot of it so in the end I wasn't really saving money. And they did redesign the holder itself so now it runs a lot smoother. The older version (as many of my friends know) would always get stuck and you'd have to crank it with your nail. A big pain in the rear! And I've had the tape on numerous ones rip which means you just gotta throw it out. With the new design, however, I find that I have to pull the tape because the adhesive is stretchy so when I lift off the paper, a piece of it stretches and leaves nothing on the tape to grip on the next piece of card stock I want to glue. You can't refill these so it's a lot of plastic to throw out. It also comes with a new lid each time. It's a little cap that fits over the front end of the runner but it doesn't stay attached so it goes missing very quickly for me. It's probably somewhere in my crafting mess. Definitely won't be buying these anymore. 


2. Ad-tech- I bought this when I first started card making at Wal-Mart. I think I went out and bought this after my first card workshop. I was waiting for my SNAIL to arrive and I needed something quick. I ended up buying a whole bunch because I thought it was a good deal for about $2/refill. The rolling is very smooth and because it's little dots instead of a continuous long piece of adhesive, you don't get the stretching like with the long piece of adhesive glue runners. Again, doesn't stick well at all and I still have all those refill packs I purchased 2 years ago sitting and collecting dust. One bonus to this is that if you're in a pinch, Wal-Marts are open late and you can pick it up while doing some late-night crafting and the dots are apparently repositionable before you push down on it. But as my photo shows, even a good bone folder squishing doesn't make it stick. Refilling is easy. Just push on the tabs on top and it pops out the old cartridge. The blue cartridge doesn't get thrown out so there's very little waste. It also comes with a little cap cover that doesn't stay attached and is lost easily. But it doesn't come with every refill so a bit less plastic waste in that aspect. 
3. SNAIL- Stampin' Up's famous adhesive made by Tombow Adhesive. It has been tried time and time again. When I first used it at a workshop, I never knew adhesive came in this form! I just knew of white glue and glue sticks. So I ordered it without hesitation. Now after I started using it, I was a little disappointed as were a number of my stamping buddies because we found our cards often fell apart! It was as though it didn't even stick at all! That's why I moved over to using the dollar store ones because I felt it was the same amount of stickiness for a cheaper cost. Well I've learned a lot about this little SNAIL. First off, I've been told that if you're in a cold area, it doesn't stick as well so breathing on it a bit will help it adhere better. Second, you really need to do some good squishing and burnishing on the card stock like I did with the bone folder. It does gum up sometimes on the edges with glue snot but just pick it off! I haven't had one rip on me ever and it's application is always super smooth. Runs like a fine-tuned machine! It also comes with a little plastic cap that can close and protect your adhesive when travelling with it in your bag. With the SNAIL, I don't need to run it along the entire back-side of my card stock like I do with some of the other adhesives so although it costs more, you use much less of it. Refilling is again easy. Just push on the tabs on the top and bottom and it pops out. It's still more waste than the Ad-tech because the clear side of the glue holder gets thrown out each time you refill. 
4. Scotch Permanent- Jamie bought this from Michael's I think when he was trying to make me a card. Typical guy goes out and buys stuff instead of just using what I have in my craft room! He bought it with a refill too and I just never felt inclined to use it. I love how it's purple and easy to spot on a craft table but I find it difficult to use in that when I apply it to card stock, I almost can't feel it go down. Then I have to look down on the paper to see if any adhesive actually came out! It's quite transparent so perhaps good for vellum. I don't know about you, but I like feeling the "clicking" when I'm rolling glue along. It lets me know that adhesive is coming out and this isn't clicky enough for me. Refilling is also easy. You just hold the two tabs at the back of the holder and it slides out. Now the solid colored plastic at the back gets thrown out with every adhesive refill so there's a fair amount of waste. The new one just slides in smoothly, kinda like parking a car into a garage! Sorry I couldn't find a better picture! 
5. Creative Memories- This little fancy gadget was given to me by a dear friend Robyn. She's a CM consultant and up until she became one, only used SNAIL. She loves how the adhesive comes out in little rectangle strips so it starts and stops with ease. There is never any "stretching" with this adhesive. It is comfortable to use and even has a little slider you can close to prevent your adhesive from being stuck to something in your bag. It even has a tension controller that a lot of people love. I personally haven't adjusted the tension so I have no idea if it's good or bad. I have no idea how to refill it or if it's even refillable. I do hope it's refillable because it's a LOT of plastic to throw away if it's not. I opened up the cover and can't seem to pull out the adhesive to see if I can change it. I also don't want to muck it up because there's still a lot of adhesive on the roll. Now when I first tried the adhesives on white card stock, this adhesive didn't stick very well. It didn't rip the white card stock like it did the black. I'm not sure if it was the card stock was different or what because I still did a lot of smooshing the first time around. The downside from what Robyn has told me is that it comes in packs of 6 for her! So you better really like it if you're going to order it. 
6. Scrapbook Adhesives EZ Runner- This product has probably been around for ages but I just recently bought this at Christmas time. I was at Treasured Memories on boxing day and they had a nice big sale. I think it was 30% off everything in the store. Jamie was in line for me while I shopped (a sweetheart I know) and the lady in front of us had about 5 packages of the EZ Runner. It comes in single and double packs and available at craft stores all over. I decided to give it a try since she was buying so many! It was about $10 for 2 but I got it for 30% off. It has the same concept as the Creative Memories adhesive where it comes out in little rectangles. It sticks quite well if you really smoosh it down. The biggest problem I have with this is that I always go to use it upside down! I don't know if it's the shape or what but I always try to use it the wrong way and have to turn it around. This happens almost EVERY time I pick it up. These aren't refillable so it's probably the most plastic to throw away (a close tie to the CM one if you can't actually refill it). 
7. Scotch ATG 714- I finally made the big leap and bought this huge sucker after reading many good reviews on it. It's almost the size of a packing gun but surprisingly easy to use. The gun itself is a pricey investment but the glue refills are cheap. I bought mine on Ebay and with 4 rolls of the ATG Gold acid-free tape it came out to $95 USD and I had to pay around $5 duty on top of that. I have no idea where else I could buy glue refills other than from online stores or ebay. The biggest challenge with using it is that the glue is VERY stretchy. If you pull use it on card stock and try to pull away, it'll stretch and then shoot back like an elastic, leaving you with a wad of adhesive. It has a trigger that you have to hold when you are using the glue and after a few tries, I figured out how to prevent that wad of glue. Once you want to stop the adhesive, I let go of the trigger and almost do this extra final push onto the card stock. So I am basically "smearing" the adhesive in order to end it off without stretching. It comes with directions on how to refill the glue and although seems scary to do, is actually quite easy. It has the glue on the left side so as a righty, I can see where my adhesive is going down. Would probably be awkward for a lefty. It's big size takes up space on my crafting desk but I never lose it! It's also bright red which some may or may not love. There are people that go to Michael's and pick up some plastic paint and bling out theirs. It is VERY sticky so I often find it's VERY VERY difficult to reposition things once it goes down. If I just lay it down I can sometimes get away with trying to pull it back up but if you do any squishing, it's over. It's stuck for good unless you want to rip apart your card stock. This is the adhesive I use most often. It is a bit tricky with smaller pieces of card stock and for those, I just use SNAIL or my Tombow Multi Liquid glue from Stampin' Up.


So those are my thoughts on a few different adhesives. I might do another one on various liquid type glues =) 

SPCC #34

Yay!! I'm sooo glad that I have today and tomorrow off. It was such a LONG stretch last week of 6 days. Thank goodness I managed to get the last color combo done yesterday! So far I'm glad I have been able to do SPCC's challenges every week since I've stumbled onto the blog. I'm so glad Samantha and the amazing SP divas are running this blog. The biggest reason I like it, other than the fact that all the divas are the sweetest people every, is because they don't overload you with colors. Some color challenges give you 4-6 colors to use and it gets overwhelming for me because I really like CAS (clean and simple) cards. This week's colors worked perfectly with the leftover card stock I had from 2 weekends ago. I just needed to swap out the Summer Sun and replace it with Rich Razzleberry. Here's an easel card again I've got a few weddings this year so I figured I'd get a head start! You can't tell but the bride's veil and dress are lined with Dazzling Diamond. And the words "To have and to hold" are darker because I stamped it in Versamark first, then Rich Razzleberry so I could emboss it with some clear powder. Off to make more cards! Three cheers to days off!! Hip hip hurray! Hip hip hurray! Hip hip hurray! 


Card Ingredients
All items Stampin’ Up unless indicated.

Stamps: Stems & Silhouettes jumbo roller, To Have and to Hold
Ink: Bermuda Bay, Rich Razzleberry, Staz-On Jet Black, Versamark
Paper: Bermuda Bay, Whisper White, Rich Razzleberry, Soft Suede
Embellishments: 1/2" polka-dot grosgrain in Soft Suede, Pearls (Kaiser Scrapbook), Dazzling Diamond glitter
Tools: Big Shot, Elegant Bouquet embossing folder, Stampin' Dimensionals, 2-way glue pen, blender pen

Sunday, February 7, 2010

SPCC #33


Wow I can't believe it's finally SATURDAY NIGHT!! Tomorrow will be my 6th day of work and I am excited!! Working 6 days when you're used to working 4 days a week really tires one out!! Today I came home and fell asleep on the couch from 5:30 to 8:00!! Good thing Jamie cooked dinner! We ordered Panago Pizza yesterday and now he's on this mission to perfect the pizza he makes. So today we had pizza for supper. It was probably the best one he's made to date. But boy, healthy pizza is definitely a little less tasty than unhealthy pizza. When we were deciding what pizza to order from Panago, I decided to look at the calories involved with each slice. Can you believe that a slice of vegetarian and a slice of the panago classic (basically a deluxe pizza with pepperoni, ham, onion, mushrooms, black olives, green peppers and sauce) BOTH HAVE 220 calories each!?!? So when i ate 4 slices at work the other day, I had almost 1/2 my days' calories!! 


Now I'm not sure if I've ever mentioned anything about my job but I'm a public health nurse. That means I visit new moms when they come home from the hospital with their baby and I also give immunizations in our clinic and a bunch of various other things that relate to primary health care. I had to visit a mom this week that had a 39 week old stillborn and it was an extremely hard visit to do. Even as an outsider to the situation, my heart ached for this family and I can't even imagine what runs through their mind every night before they fall asleep. There were so many unanswered questions and there always is. The biggest one for this family was the "What if" questions. What if I had asked the doctor to perform a c-section? What if I went to the hospital sooner? Sometimes I think we take for granted how amazing it is that a healthy baby is born. Just take a second today and be thankful for us being born healthy and for our healthy partner, family, friends and their children. 


Here's my take on this week's SPCC #33 challenge. I love the colors an thought of the Circle Circus set as soon as I saw the colors. I wanted a lighter pink in there so I stamped the Pink Passion "full strength" first and the other image I stamped on scrap and then stamped onto the card stock. It's a great way to get various shades from one ink pad. 

I better end this here and head to bed! Another day of baby heels to be poked and breastfeeding moms to help! 


Card Ingredients
All items Stampin’ Up unless indicated.

Stamps: Circle Circus, Older & Wiser
Ink: Pink Passion, Read Red, Summer Sun
Paper: Tempting Turquoise, Summer Sun, Whisper White
Embellishments: 1/4" Real Red grosgrain ribbon, pink buttons (Wal-Mart?)
Tools: Stamp-a-ma-jig, glue dots, Tomboy Multi Liquid glue

Thursday, February 4, 2010

The Dreaded V-Day Is Only 11 Days Away!!!

Well it's not what you all may be thinking when I call Valentine's Day the "dreaded" day. It all started just before Christmas when Jamie somehow managed to convince me to register for this year's Hypothermic Half Marathon. Now for those of you that know me know that I am absolutely NOT a runner!! I did a 5km run when Jamie and I first met and I managed to finish 3rd last out of everyone that was running (old and young!!). I think he convinced me when he said, "Well if you get tired halfway, just go home!" and then I thought to myself why the heck not? It's the only race that goes right past my house! 
So I've tried to start a training schedule but 2 months to go from a non-runner to a 1/2 marathon runner requires some intense dedication, dedication that I don't have!! 


Let me share with you some of my intensive running history. I've always been able to do those short dashes that everyone needs to do in school like the 100m dash etc. Then when my ex and I broke up, I tried to pick up running to keep myself busy. It was then that I figured out that my right foot tends to get numb at about the 13-15 minute mark. It was the same thing everyday so I gave it up. Then I met Jamie and he was a big runner so in my attempts to woo him, we went on a few jogging "dates". Now lets flash forward to last summer. Jamie needed a new pair of runners so we headed over to the Running Room (pricey but he's quite picky about the shoes he wears). I decided to get fitted for a new pair of shoes to see if that was what was causing me numbness. Now I don't know about you but I definitely don't shave if I don't plan on wearing shorts or having anyone see my legs. Jamie and I have gotten to that level in our relationship where my legs can be as hairy as his and he doesn't care (or so he says!). Now with the fitting, this young man asked me to roll my pants up to my knees. My jaw dropped and I almost died from embarrassment! I told him I didn't shave and I tried to roll it low enough but still be high enough. Good thing he didn't have to closely inspect my foot and only needed to see me run....haha that's probably not very good either! 


So flash forward again to now. We managed to run 2 km the very first day out. Boy was I exhausted and we did that 2 km in like 40 minutes!!! It was very discouraging. Jamie kept reassuring me that it was because we were running in some newly fallen snow. Sure enough, the next time we went out, we managed to run to Penny's house (3.6km there and back) in 40 minutes. Then on Saturday it was the first time we hit 8 km and it took us 1hr and 20min. Today we did just over 8km and it only took us 1hr and 10min! My foot still gets numb but I've been google-ing some info and tried a few different things. I laced my shoes up from top to bottom, left my laces super loose and put orthotic insoles in. So far all I've managed to do is lengthen the time between feeling the numbness and the intensity of the numbness. I describe it to Jamie as "my foot is getting dull". Anyways I know this post has been uber long but I was so excited that we almost ran 10km today!! The furthest I've ever ran (with some walk breaks of course)!!


I want to end off with a card that we made last weekend. This quilting card is super easy to make! Just punch out 12 squares with a 1 1/4" square punch and glue it on a 3 3/4" x 5" cardstock. The faux stitching on this quilt was hand drawn in. Easy peasy! I'll keep everyone posted with my hypothermic progress!! 
Card Ingredients
All items Stampin’ Up unless indicated.

Stamps: Oval All
Ink: Chocolate Chip
Paper: Pretty In Pink, Chocolate Chip, Whisper White, Sending Love Specialty DSP
Embellishments: 1/4" Grosgrain Ribbon in Real Red
Tools: Big Shot, Backgrounds 1 Texturez Plates, Chocolate Chip marker, large oval punch, 1 1/4" square punch, scalloped oval punch